Black and Gold Vestments: Making a Chalice Veil
Black and Gold Vestments: Making a Chalice Veil
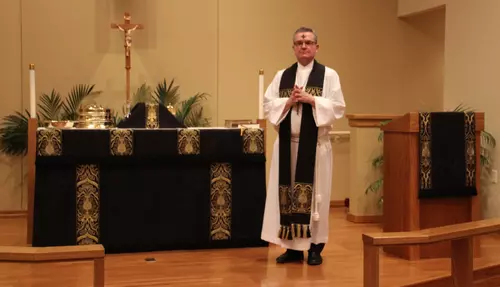
My children were laughing after the Ash Wednesday Service. They loved the new vestments and heard all of the buzzes throughout the evening. Their comments afterward went something like this, “Your new set is great. Everyone loved it. Yeah, you thought the white set was great when you made that, and now you want to replace it. And how about that red set for Palm Sunday? Does that need replacing too? Why? They are fine!”
My response was, “But I did not know what I was doing years ago when I made those sets. They need to be replaced with something better. This black set is different.”
Kids: “”Yeah, we’ve heard that before……… And by the way, how long will it be before you want to replace this new black set? You always love things when you make them, and then later think they need to be replaced………we’ll give the black set about 3 years……….. .”
And there you have it from the family experts on the life expectancy of vestment sets previously made by yours truly. At least, those wise sages are right about the previously made sets.
There are three altar hanging sets in use at my church, made by me, that need replacing. Why one may ask? The reason is simple: a lack of knowledge. The sewing skills were there, but not the knowledge with regards to specific and unique techniques required with vestment making. I’ve been sewing for over 40 years. I have a degree in design, and I’ve worked in many fields relating to sewing and design. I’ve worked my way through many projects, but here I was completely stuck.
Learning to make vestments and altar hangings was almost an impossible endeavor. The information on vestment making that exists is limited, lacking sufficient detail to easily proceed. It often takes months, and even years of labor and struggle to figure out the techniques. I admit that three vestment sets in use at my church were made during the time of struggle better known as the “Vestment Dark Ages.”
Thankfully, there also followed a period of Enlightenment. The resources, though often dusty, hidden, and buried in the pages of old books, and bits and pieces of Ecclesiastical History, have been revealed and pieced together to create an understanding of the process. The goal now is to create altar hangings that will survive the “allotted three-year life span,” currently given to vestment sets by the sages of my household. But all of those struggles with learning the craft of vestment-making have paid off.
Now the goal is to make that information available to others. There is a dear vestment-making friend who has been a patient mentor for years. We now share the same goal. At her urging and with her encouragement, this humble attempt will be made to help others create beautiful items for the Worship Service at their church. Many of these same items are used by a wide variety of religious denominations.
Making a set of vestments like the ones above is not beyond the means of a seamstress or tailor with moderate to advanced sewing skills. Several of the items are even suitable for the beginner.
The simplest item to make might be the Chalice Veil. The dimensions of the chalice veil can vary. The size used for my church is 24″ square. To keep the project simple, a plain fabric can be selected, and I will go through making a plain fabric chalice in a few days. For now, the photos are available for this fabric with a pattern.
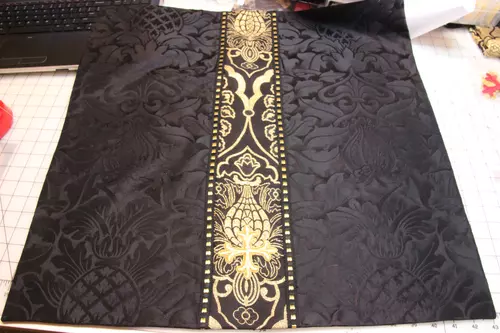
This example is made using the Black Fairford Fabric available in our online storefront coming in 2016. While shown here in black, Fairford is also available in other Ecclesiastical colors such as red, blue, green, bridal white, ivory, violet, and gold as well as in two-toned colors.
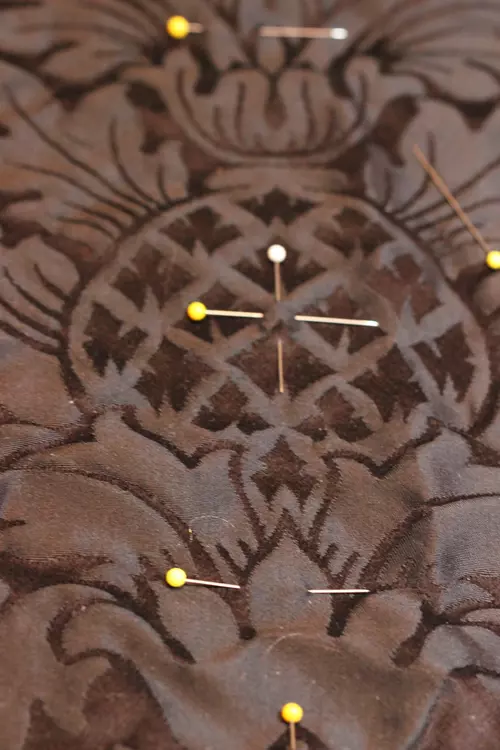
If you take a close look at the pattern designs in the Fairford, there are two main motifs: the Pineapple and the Ogee. The pineapple motif was selected as the central motif on this chalice veil. The two crossed pins mark the center of the pineapple.
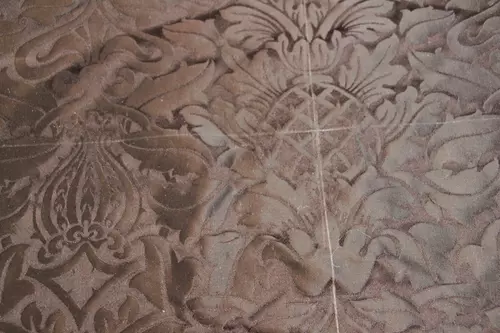
I have a confession to make: a piece of Wax Tailor’s chalk, lying on the work table was picked up and used, without thinking, to mark the center lines. Then, a moment of horror struck! What had I done? This stuff leaves wax marks on nice fabrics after pressing. The lines should have been hand-basted. Too late!
Fortunately, that wax mark disaster never materialized. Most of it was brushed off or worn off in the process of making the chalice veil, long before the iron was needed. Disaster averted. But more caution will be used in the future. The tailor’s chalk is fine for seam allowances and areas behind the scenes, but I should know better when it comes to using tailor’s chalk on the main body of a vestment item.
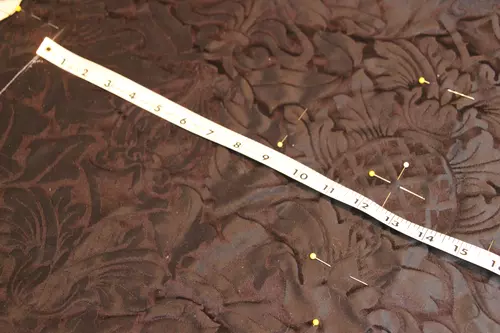
Start at the center. Measure out 12 1/2″ from the center on each side, and place a mark. Use the same steps to mark the top and bottom edges. This will create a 25″ square which includes a scant 1/2″ seam allowance. The finished dimension will be 24″ square chalice veil.
The pattern design in Fairford makes it easy to match the same motif point to obtain straight and even lines for cutting. Check along each line, matching similar motif points to make sure all lines are straight. Recheck all measurements to ensure a true and correct 25″ square is marked.
If you have never worked with true Ecclesiastical fabrics, you are in for a treat. The fabric is so nice to work with. It has a great weight and body, which means it does not shift or move as one is working on it. It stays in one place.
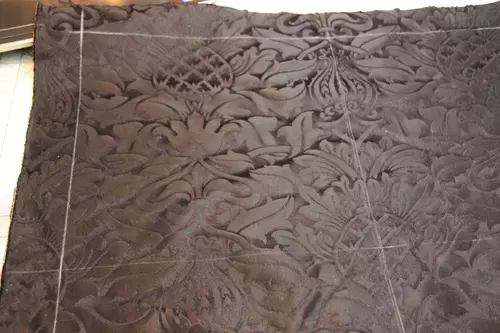
The fabric is marked with the final dimensions of a 25″ square to include a 1/2″ seam allowance on all sides. Be sure to measure accurately, and have your fabric perfectly square, regardless of the size of your chalice veil. After double-checking that all measurements are 12 1/2″ out from the center and follow the same motif line in the design, it is time to cut. For those using a solid fabric, cut a nice, even square in the desired size. Be sure to keep the fabric on the straight grain.
Easy so far, right? Nothing more than a square of fabric. The Chalice veil will require a lining fabric to be cut to the same dimensions. If a lighter-weight fabric is being used, an interlining of some sort may be required to add the body. But we shall take that step by step.
Certain vestment pieces are often made in sets: the Chalice Veil and Burse are usually made to go together, as are the stole and chasuble. Looks like there are a few more projects needed down the road. But one step, or rather project, at a time.
Next up: orphrey trim and options for no orphreys.
Solo Dei Gloria
Be sure to visit our online store front Ecclesiastical Sewing where you may shop for Liturgical Fabrics, altar linen fabrics, church vestment-making patterns, liturgical machine embroidery designs, church vestment trims and notions and so much more. You may also find us on Ecclesiastical Sewing on Facebook, Twitter, and Pinterest. Sing up for our mailing list at the bottom of the page on our online store front and receive a free copy of our Small Linens Booklet as our way of saying thank you for following along.
What Sets a Truly Exceptional Chalice Veil Apart?
Square Yoke Surplice Pattern in Multiple Sizes
Chalice Veil Orphrey Trim Part 2
Making a Chalice Veil Part II: Good Friday Chalice Veil
Rose Chalice Veil Construction
Liturgical Fabrics
Passion Cross on Ash Wednesday Chalice Veil


 RSS - Posts
Thanks for the aid! When First Communion is over and I complete this project I think I am going to sit down and read your entire blog.
Thank you. I hope to continue to write so others may be inspired to take on sewing projects for the church. Best of luck with your project.
Hi Carrie, Father never got back to me with the height of his chalice. The veil he let me measure 3 weeks ago was 21 and when I look at it in Mass I think it’s too short. It doesn’t really touch the alter right. So I erred on the larger side and made mine 24 inches. I buckled down and finished this afternoon. It’s finished just in time to debut at First Communion this Saturday. My oldest is receiving the sacrament, this is extra special for me.
Thank you again for your guidance and support.
Here’s how it went:
Rebecca Casiple 708-214-8545 cell/text
>
More pics
Rebecca Casiple 708-214-8545 cell/text
>
Father gave me complete artistic license and told me to surprise him. He wanted a special occasion chalice veil for First Communion or other sacraments. The design came from the railing outside of church. I’m going to send him on a hunt to find where I got my inspiration 🙂
Rebecca Casiple 708-214-8545 cell/text
>
Dear Rebecca,
Congratulations! How exciting. Chalice veils are so nice, and add much when they have a special design. And for you, doubly nice with your child’s special day for First Communion.
I am afraid WordPress is not allowing photos to be attached to comments. If you might have a Flickr account, or Pinterest, you might be able to post a link for the photos. I would love to see them.
Enjoy your special day this Sunday.
Carrie
Ok-I will have my husband post the pics and send you the link.
Have a wonderful weekend,
Rebecca Casiple
708-214-8545 cell/text
>
How tall was the chalice you made this for? I’m trying to figure out measurements for the one I’m making. Thanks
I do not have the measurements of the chalice or pall available at the moment, but will try to get those over the weekend. Our church has used white linen chalice veils that are 24″ square, and they are short by about 1 1/2″ on the back side.
The formula given in the book “Church Needlework: Burse, Veil, and Stole” which was put out by the Embroiderer’s Guild uses the formula “Height of chalice x 2 plus the width of the pall.” For an 9″ high chalice with a 7″ pall on top, the dimensions would be 9 + 9 + 7 = 25″ finished size. You may wish to add 1/4″ to 1/2″ to the overall dimensions for that little bit of “extra ease” that sometimes comes in handy if the veil is not perfectly positioned. One can always cut a “sample” out of inexpensive fabric to verify measurements are accurate as well. Best wishes with your project! Feel free to post a link to Pintrest of the finished project.
I didn’t know I had a Flickr account. Hopefully I can link here:
https://www.flickr.com/photos/clerical_frockcoat/
I’m sorry – I had a typo. I wondered if you had a Flickr account and if so, whether you might be able to upload photos for us to enjoy. If you have a chance to upload photos, it would be wonderful to see your work.
Blessings,
Carrie
Thank you very much for this. I have just made my first attempt at a chalice veil – a bit simpler than yours as the fabric was plain. I would post a picture but I am not sure how?
Fr Andrew
Fr Andrew,
I’m not sure if you can post a picture in the the comments section. If that does not work, if you have a Flickr account, you can post a link.
Carrie