Priest or Pastor Stoles: The Tricky Parts
Priest or Pastor Stoles: The Tricky Parts
For those of us who love Ecclesiastical Sewing and Vestment Making, there is always that one part of any project that is the Priest or Pastor Stoles “tricky” part. With altar frontals, it is ensuring orphreys are smooth with no puckers. With chasubles, it is the neckline and the lined hem. Every project has a little stumbling block that, if overcome, it can make the entire process much smoother.
Cutting Out
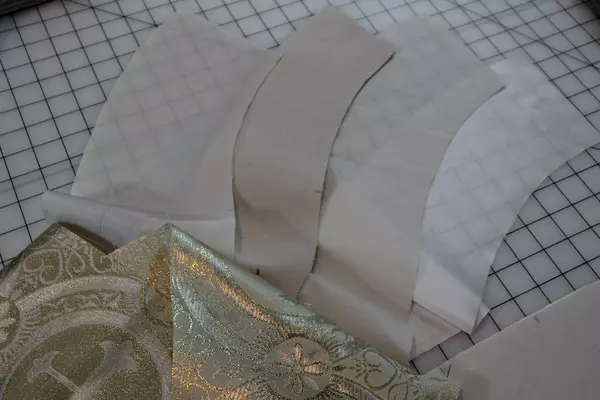
The project in the works at the moment is a pastoral stole for the vacancy of Pastor at our church. The fabric selected (because it was on hand) is a silk shantung, which is slightly lighter in weight than a dupioni. The fabric has fewer slubs, and the few slubs present are small and easy to work with. The problem with the Silk Shantung is that everything will show through the fabric. The hand is nice, and the color is a soft white or light cream, but it is semi-transparent – do you notice the grid lines of the cutting board showing through the fabric on the right? See what I mean about seeing everything through this fabric?
The solution that will be tried for this Pastoral Stole will be to borrow a page from the books of Couture Sewing, and that would include the use of underlining. The choice? An unbleached muslin. Now several items would work well for underlining: China silk, a second layer of the fashion fabric, light broadcloth, and the like. The key is to have something fairly lightweight, with a little body. It also helps to have something less transparent than the Silk Shantung.
So, from Right to left, the fabrics in the above photo are:
- Silk Shantung
- Unbleached muslin (underlining, meaning two layers put together and from that point on, worked as a single layer)
- Canvas interfacing
- Lining fabric
The next task is to baste the underlining to the Silk Shantung, but sadly, the camera missed the photo op on that one.
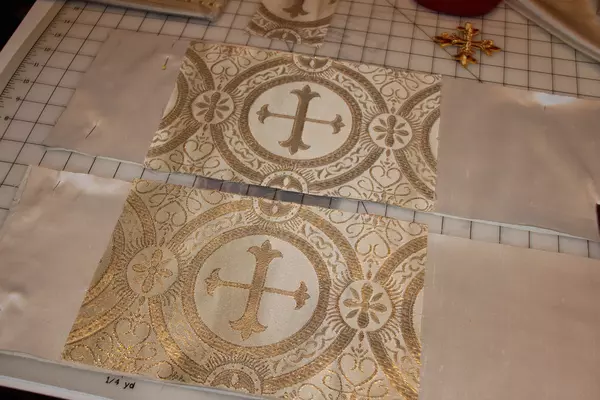
The Orphrey Size
When determining the orphrey size and placement for a stole, the grid on the cutting table is extremely helpful. The stole is laid out on the cutting mat, making certain the lower edges are even. Next, the orphreys are cut, making sure the pattern repeat is identical. This orphrey has a larger circle with the Fleur cross, and a smaller circle on each end. Now the orphrey could be placed exactly at the lower edge, but this stole will not have any other decoration on it, other than the orphrey and a gold cross at the back neckline. So, following the design rule of “threes,” the decision was made to have a small amount of plain white left at the lower edge, then the orphrey, followed by the rest of the stole as the plain fabric again.
Having “three” variations along the length of the stole will make a pleasing visual break for the eyes. If the orphreys were at the lower edge, there would be two variations, and sometimes that gets a bit boring visually. The use of “three” or odd numbers keeps the eyes traveling up and down the stole length. The variations for the number and placement of orphreys on a stole are unlimited, but some rules should be followed. But that is a topic of its own for another day. I chose this simple design because I have not yet met the person who will be wearing this stole, and simpler may be better.
Stole Ends
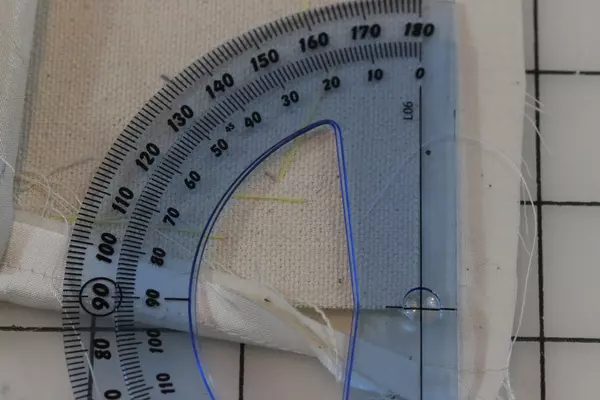
Now for the “tricky” part of the stole: the lower edge. Sometimes the stole edge goes great; other times they never go well, and it can take hours. But for this project, I do not have hours to fuss with a stole end. It has to turn up correctly and be ready the first time for stitching. Thinking for a moment, the kids were recently working on geometry and angles, and there is a tiny protractor in the pattern drafting tools………. hmm…………could this help? Could this be an answer to those pesky little stolen lower edges? There is only one way to find out.
Marking Stoles
In a matter of moments, there were two lines marked on the stole corner: one at a 45-degree angle in the corner, and another line perpendicular to that at the tip of the corner. The plan: fold up the corner, and see if the sides will fold to the 45-degree line.

Folding
Folding the corner was the easy part. Next, the stole sides must fold in.
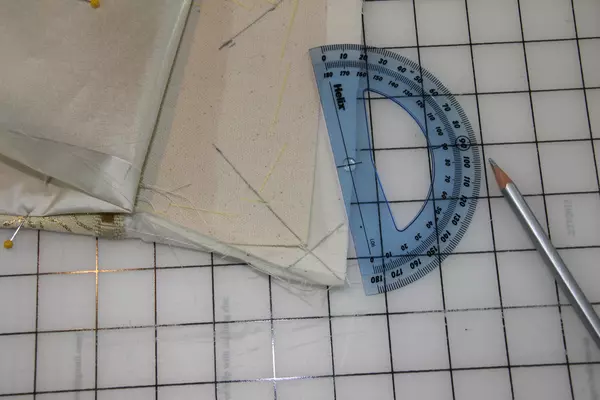
The fabric is folded to match the 45-degree line. Now for the bottom edge to see if the idea worked.
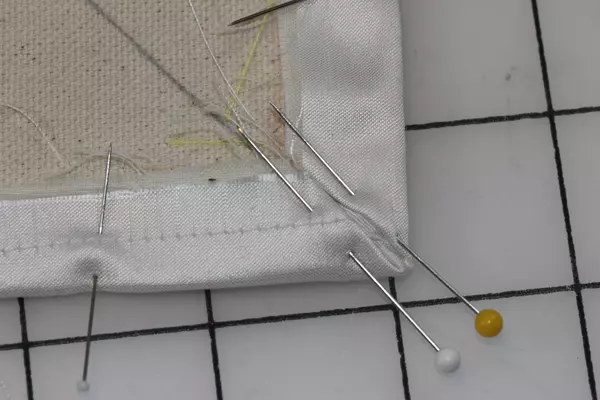
The lower edge and sides are folded right to place, and the corner is ready for stitching. Now, you might be saying, there is a horrid gap. It will never stitch together. The reality is the gap is tiny. The macro lens on the camera is exaggerating the gap at the corner. Careful stitching will have the corners completed in a few moments, and this part of the hem will take only a few moments, instead of hours. Geometry can work wonders!
I have never really minded the hemming of a stole, but using this method going forward will speed up the process of finishing a stole end, making it more enjoyable and less of a fuss.
I hope this may help some who struggle with stole ends.
Solo Dei Gloria
Be sure to visit our online store front Ecclesiastical Sewing where you may shop for Liturgical Fabrics, altar linen fabrics, church vestment-making patterns, liturgical machine embroidery designs, church vestment trims and notions and so much more. You may also find us on Ecclesiastical Sewing on Facebook, Twitter, and Pinterest. Sign up for our mailing list at the bottom of the page on our online store front and receive a free copy of our Small Linens Booklet as our way of saying thank you for following along.
Stole Ends: Quick Tips
What Vestments Does a Priest or Pastor Need?
New Pastoral and Priest Stole Patterns
How to Cut Orphrey Bands
Church Vestment Stole Patterns for Pastors and Priests by Ecclesiastical Sewing


 RSS - Posts
What type of “canvas” do you use? HYMO?
Hi Kris,
When making a pastoral stole, the canvas is a 15 oz. 100% cotton canvas in the natural color. In the States, the canvas found at Joann Fabrics is nice to use. It is easy to confuse canvas with duck cloth. I prefer the canvas. The duck is still and has a “crunchy” feel. The canvas is “heavy” but will mold and take a shape nicely. Canvas will also be available at our online store soon.
I have not used HYMO for stoles, (only in tailoring and working pad stitching) but it would also work. It is more expensive and more difficult to come by. The cotton canvas is usually readily available.
Best regards,
Carrie