A Simple Design Framed Up
A Simple Design Framed Up
A Simple Design Framed Up: It is so rewarding to feel like something was accomplished at the end of a weekend, especially when the weekend started off feeling like nothing was getting done. Sometimes weekends are spent laying the groundwork so that an actual project can be started. And that is exactly the type of weekend this was when it came to Ecclesiastical Embroidery Designs and Ecclesiastical Sewing.
Weekend Progress
The weekend started off with a bit of excitement when a package of supplies arrived from England. Silk Dupioni had arrived earlier in the week. This meant that the IHS Embroidery design could begin soon! Linen laundry was the only holdup.
Yesterday’s post was about preparing linen on Wash on Friday and Iron on Saturday and I am pleased to announce that now my linens are all preshrunk, ironed, and neatly put back in their places, I can start on the new project today!
This hand embroidery project is part of the Rose Vestments that I have already talked about a few times. You can check out the rest of the links at the bottom of the page.
Today’s task was simple. Cut the linen and silk dupioni to size, pounce and trace the IHS embroidery design, and start the stitching. Here is how everything went.
Frame Selection and Linen Choice
Frames are always an issue – which one to use in which size. There were a few unused sizes in the EvertiteStretcher Frames. There was a 16″ x 17″ frame that had muslin already stretched and ready to go. It would be nice to have the frame an inch or so larger, but that was all there was. I only have two sizes in the Millenium frame, and the larger one was in use, so the Evertite Frame gets the nod on this project.
Time to add some linen. The linen of choice is Alba Maxima. This IHS Embroidery design will have heavy goldwork, and so I need a linen that can hold up to lots of plunging of goldwork tails. The other linens I have would also work nicely. But this linen is going to be completely covered with dupioni silk, and since Alba Maxima is not as expensive as the other linens I have on hand, this is the one to use.

Layering Fabrics on the Frame
The linen went on the frame quite nicely. Next up, add the silk. Now I realize I did this kind of backward, but the muslin was already framed and tight, so the other fabrics were added in layers, checking to make sure nothing bubbled anywhere.
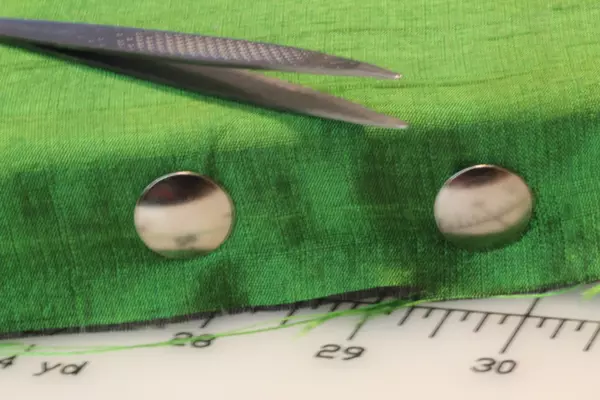
The silk was a bit tricky to add, trying to make sure it stayed on the grain. Those slubs are noticeable; it is not framed up straight.

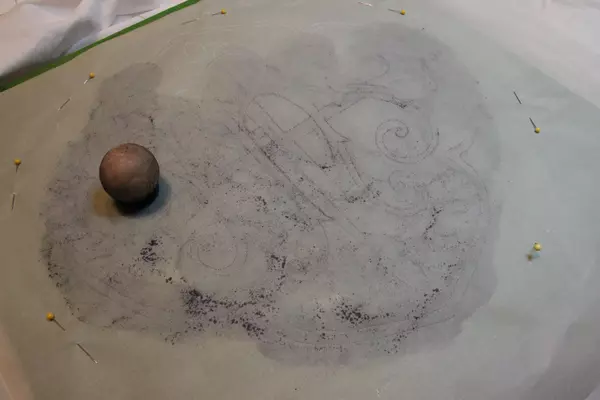
Next up, time to pounce. I remember back to the first project when I used pounce powder. It took forever to get the nerve up to try the technique. There was a fear that this method just could not work to transfer an embroidery design. Trying is believing! It really is simple, provided one remembers the tricks.
I have always transferred a design onto a fabric that is framed up. I also always place something underneath the frame – usually a book or two that is the correct height to eliminate any movement of the fabric while pouncing.
Tips for Pinning and Aligning the Pattern
When pinning the pattern to the fabric, try to make sure there are no bubbles in the pattern. Make sure center marks on the pattern line up to ensure the design is square to your fabric. ( I have forgotten this in the past, and pounced and traced a design before noticing that it was not squared up properly).
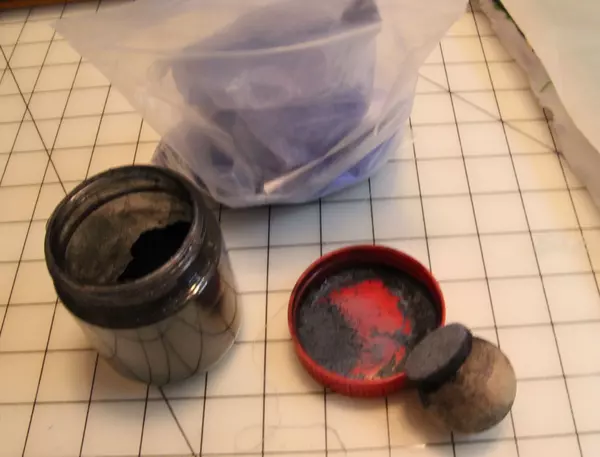
For this project, I used homemade black charcoal pounce and added a tiny amount of blue quilt pounce. The black most likely would have worked fine by itself, but I was concerned because the silk has black threads to make it iridescent. The addition of the blue gave the pounce a periwinkle tint, to ensure it would show up. White quilt pounce would also have worked.
Pounce
Next up, pounce. Yes, pounce. Do not rub. Pounce. Up and down, going over every part of the Ecclesiastical Embroidery Design. There is a fine line between making sure the entire hand embroidery design is covered versus doing too much and blurring the lines. How to tell if it is just right?
Lift a corner and take a peek. If things look good, check a little further. Most of the time, you can see enough under a corner of the embroidery pattern to ensure the entire design is covered.
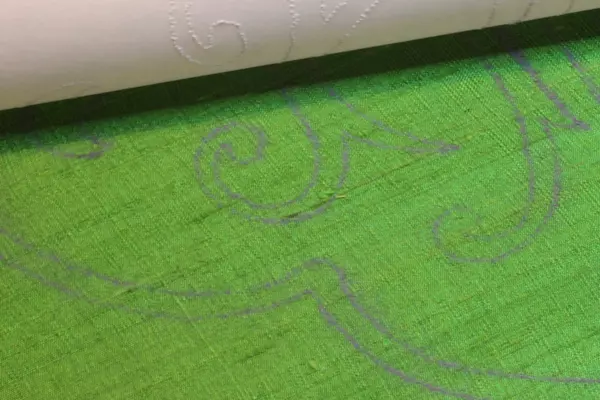
Success! The entire design transferred. Next up, draw the lines and first stitches. Later on this week, I’ll give you an update on the Easter Set Pulpit Fall, and a look at a few more items from Summer Travels. Until then, thanks for reading along.
The links to the rest of the articles on the Rose Vestments are found here:
New Projects in the Works Soon
Solo Dei Gloria
Be sure to visit our online store front Ecclesiastical Sewing where you may shop for Liturgical Fabrics, altar linen fabrics, church vestment-making patterns, liturgical machine embroidery designs, church vestment trims and notions and so much more. You may also find us on Ecclesiastical Sewing on Facebook, Twitter, and Pinterest. Sign up for our mailing list at the bottom of the page on our online store front and receive a free copy of our Small Linens Booklet as our way of saying thank you for following along.
Sacristy Check List: 10 Things to Review for Fall
Preparing the Advent Pulpit Fall Design
Pouncing with the Blues
New Embroidery Frames Mean New Projects
Hand Embroidery Design Framed Up
Results of Organization Weekend


 RSS - Posts
You must be logged in to post a comment.